Paul Carmody Posted June 9, 2024 Posted June 9, 2024 (edited) You could use an acid etch.Brush it on the bare spots.Any brand should work.This is an example.It should help adhesion.If I were to paint the whole part I do a multi step process. Edited June 9, 2024 by Paul Carmody 1 Quote
Jim Roadt Posted June 9, 2024 Posted June 9, 2024 Thanks ,I will cook everything except the rear housing Quote
Marc Sova Posted June 13, 2024 Author Posted June 13, 2024 So I ditched the idea of preserving the original paint after sripping off the black. There was simply too much loss. So I spent most of the last few days prepping for paint, matching the color very precisely by hand, and then painting today. Very pleased. Shot it in one shot lettering enamel which is pretty nice paint frankly. Pardon the non booth situation but it worked out great. No bugs landed in it even!!!! Fwiw the original paint was not mirror finish show car quality. I think I did at least as good. Had to do a little bit of filling/glazing for some small imperfections. I didnt go crazy though because I remember seeing a lot of little stuff in the original finish after I stripped the black off. They used heavy white lead primer and this actually did a pretty good job filling a lot of little pits in the casting. But it didn’t get everything. Not quite as good as japan filled them. Now i have to decide what to do with the blade. I’m a stickler for historically accurate especially on a significant fan like this. I’ve been leaning towards polished brass even though I’m am not really a polished brass kind of guy. But as nice as the painting went today I’m kind of 50/50 on whether to paint or to polish. Also….gotta deal with the French gray badge. It has nickel around the perimeter and of course the backside. Should I just take the whole thing all the way to polished brass? Is that what folks do when they restore a French gray? Or were there some French gray that had solid brass badges or were they all nickel around the perimeter? And then there’s the motor tag…. Scouring through that 29646 post here that has a lot of badge restore info lately. Not sure him I’m going to feel about it being black and brass on the ivory? There’s zero evidence of it having black…but I’m assuming the “brown” look is just the brass coming through black that’s been polished away? (Although this fan did not get a lot of polishing whatsoever. The machine shop painted it black in the 40s or 50s and the thing hung on a wall ever since then.). Is there a chance the tag could’ve been something different? Like some sort of copper oxide finish? Kind of surprised they didn’t do an ivory motor tag. Also, I kind of screwed up the corners a little bit trying to get the dang thing out. It was really a bear because I could not access the backside of those tiny pins because of the DC motor. Also, I think I’m going to leave the asbestos insulation alone. MAYBE use some insulation varnish on a small brush on in an eye roller to sort of just saturate it a bit????? I did buy some fiberglass insulation but I really don’t want to risk scarring up the nichrome wires by desoldering them and replacing that insulation. Thoughts? IMG_3928.mov 2 Quote
Paul Carmody Posted June 13, 2024 Posted June 13, 2024 Nice work!I like the color on those fans.How much if any reduction do you use on the one shot? Quote
Marc Sova Posted June 13, 2024 Author Posted June 13, 2024 16 minutes ago, Paul Carmody said: Nice work!I like the color on those fans.How much if any reduction do you use on the one shot? Thanks. I use lacquer thinner. Just straight cheap lacquer thinner from the hardware store belive it or not. I couldn’t say how much….maybe 3:1 paint to thinner? Maybe a tad more. Maybe 3:1.5. It really does lay down nice. There’s a couple spots on this that that I’m hoping can polish’s away. Nothing too horrible. Just a couple less than glassy spots. That’s the other nice thing….you can lightly polish it. I’ll prolly wait a few days then maybe go at it with some mothers. (On black I would use blue magic… I know the blue magic isn’t likely to stain the ivory color , but I don’t want to take any chances lol) 1 Quote
Bill Dunlap Posted June 13, 2024 Posted June 13, 2024 Are you really using lacquer thinner instead of mineral spirits or just plain paint thinner? If so, I may have to try that. Cheers, Bill Quote
Marc Sova Posted June 13, 2024 Author Posted June 13, 2024 7 hours ago, Bill Dunlap said: Are you really using lacquer thinner instead of mineral spirits or just plain paint thinner? If so, I may have to try that. Cheers, Bill Yeah absolutely. Always have. I used to letter a lot of stock cars with my airbrush (in the minutes) in addition to painting all sorts of vehicle art….some of the mural type stuff was done with fancier auto paint, but some of it, and all of the stock cars was done with one shot and I always thinned it with lacquer thinner. It flashes off fast leaving just the paint behind. That’s what you want. Now…if a guy was hand lettering, youd want to use something “slower” like the reducer one shot makes. But I’ve almost beer used that. Quote
Marc Sova Posted June 17, 2024 Author Posted June 17, 2024 Btw…..I wasn’t expecting this. Wool “yarn” used for oil wicking. It just kept coming and coming and coming. I washed well with dawn soap but I probably won’t reuse it. Has a strange smell…almost like tobacco. Not sure if that’s due to the ancient oil or being so close to the brushes for decades. Also….just makes me happy seeing Thor brushes in there lol. As per original, I painted the brush sleeves. I’m not sure the caps were painted originally but I did. I didn’t really see any evidence of paint on those. But the sleeves definitely were ivory. (Anyone else have a factory ivory Emerson for comparison??). Fwiw I sort of jacked up the threads inside one of the brushes trying to remove it (moron me forgot to remove the set screw in that side! I’d put a 3/8” watched extension in there to hold it/unscrew it from the brass ring keeper inside the motor. Cleaned the threads as best I could with a little pick tool. Brush cap doesn’t thread down all the way….maybe a 32nd more of a gap. but that should be fine right?) 1 Quote
Michael Bouthiller Posted June 18, 2024 Posted June 18, 2024 You could do the motor tag in ivory to match the fan better because it will look more accurate heres the tag on my 6250-G Quote
Paul Carmody Posted June 18, 2024 Posted June 18, 2024 What wicking are you going to use?Do you just pack it in? Quote
Marc Sova Posted June 22, 2024 Author Posted June 22, 2024 Btw….here’s a good shot showing the surface quality of the original paint. This is after I stripped the black paint. You can see there’s still little pits and such. They used a heavy white lead oil primer…it did a pretty good job filling casting pits but not as good a job as japanning did at filling. So…I feel really good about my paint job…there’s a few pits and such visible like this. I did do some filling mainly on the middle portion of the motor which was pretty pit-free in the original paint. But they really didn’t do a lot of geinding/smoothing on this front section I suppose because of the all the differnt angles and returns and such. I’m not really into making my fans look vastly better than they did when they were new….show car quality paint and all. I mean that’s cool too…just not really my thing. Quote
Marc Sova Posted June 30, 2024 Author Posted June 30, 2024 Scored some wool to use for the oil wicking as per original. 1 Quote
Marc Sova Posted July 15, 2024 Author Posted July 15, 2024 Putting in the new wicking. Doing a combination of a lot of wool and a few pieces of regular wicking right at the bearing opening. So far so good. 1 Quote
Marc Sova Posted July 16, 2024 Author Posted July 16, 2024 Finally got her wired up….at least the motor. Really happy with my headwire job. And the connections at the brass ring brush sleeve keeper can out pretty good too. Not the prettiest but they’re solid with good solders. IMG_5022.mov IMG_5024.mov 1 Quote
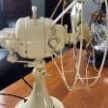
Marc Sova Posted August 18, 2024 Author Posted August 18, 2024 Got the gearbox assembled and on. I’m pretty certain Emerson painted this thing mostly fully assembled. I could tell because there was raw metal underneath the head wire access cover. I probably could’ve brought my masking in a 16th in a few places because now I’ve got some little holidays between components that I’m gonna need to touch up (like at the gearbox mounting) 1 Quote
Marc Sova Posted September 3, 2024 Author Posted September 3, 2024 Got the inventory tag mounted. Used some Brass Ager to get it just how I wanted it. (Kid. If want it to look like it’s been polished a bit by a hotel custodian an over the years. 4 Quote
Marc Sova Posted September 4, 2024 Author Posted September 4, 2024 On 6/13/2024 at 7:13 AM, Marc Sova said: Yeah absolutely. Always have. I used to letter a lot of stock cars with my airbrush (in the minutes) in addition to painting all sorts of vehicle art….some of the mural type stuff was done with fancier auto paint, but some of it, and all of the stock cars was done with one shot and I always thinned it with lacquer thinner. It flashes off fast leaving just the paint behind. That’s what you want. Now…if a guy was hand lettering, youd want to use something “slower” like the reducer one shot makes. But I’ve almost beer used that. Bill….itonic we were having the discussion about lacquer thinner. I don’t know if it’s this cheap “Klein strip” lacquer thinner from Home Depot or wherever, if maybe they’ve changed it, or I got a bad gallon, but I’ve noticed it’s not breaking down this ivory paint well off because i used to to thin (or maybe it was from another can…yeah maybe it was?) but I’ve noticed when cleaning brushes it doesn’t break it down it’s like I’m sticking my brush into water seems like I remember trickling to clean out the cup of my touchup gun I used to paint the ivory too….just odd because it thinned fine. I may have to get another can somewhere…maybe some higher end lacquer thinner from an auto body paint shop I know one shot has changed a lot over recent years too though….so it’s probably the paint Quote
Bill Dunlap Posted September 4, 2024 Posted September 4, 2024 I used Klean Strip from Ace Hardware and it worked for me with One Shot. I have lots of cans of it and it doesn't last forever before it goes off. I saved some of mine by pouring some lacquer thinner in the can and going back later to stir it up and run it through a filter. That trick has saved me some money. 1 Quote
James Gaspard Posted September 5, 2024 Posted September 5, 2024 The tag looks authentic! I love the color. Thanks for documenting this effort. 1 Quote
Marc Sova Posted September 5, 2024 Author Posted September 5, 2024 9 hours ago, James Gaspard said: The tag looks authentic! I love the color. Thanks for documenting this effort. Thanks James. Yeah….i thought it was important and might be helpful to others to do so. I’m just over the moon with this restore. Lol PH Before & After 1.mov 1 Quote
Arjun Saini Posted September 5, 2024 Posted September 5, 2024 Goodness gracious! That fan is beautiful! 1 Quote
Marc Sova Posted September 5, 2024 Author Posted September 5, 2024 8 hours ago, Arjun Saini said: Goodness gracious! That fan is beautiful! Thanks Arjun! I’m pretty happy abut it! Here’s a video I made showing some before and after pix. 3 Quote
Paul Carmody Posted September 5, 2024 Posted September 5, 2024 Beauty and function!Good job Marc ! 1 Quote
Recommended Posts
Join the conversation
You can post now and register later. If you have an account, sign in now to post with your account.