Paul Carmody Posted August 11, 2022 Share Posted August 11, 2022 (edited) I just got this R+M 2610 and the switch was a mess, very sloppy, and would work and then not.Well I went about trying to adjust and tighten it,and the same thing ,hit and miss.The brass contacts are very worn.But here is something that is very odd.To start with the nichrome windings are tiny,but with the help of magnification,there was two winding stubs where the wires were broke and missing. I was stumped at how the different speeds,or how it would work at all.There was a piece of black tape across it . I pulled it back and with horror I thought brittle nichrome was stuck to it. As it turned out someone along the way just crossed the broken windings across half the the other windings,then just stuck tape across it to hold it in place. I would not have known that if the switch was making contact with the speed post. Anyway,one wire was dead so I clipped it, then tied the hot one to the next strand so it lost two strands.That was not an easy job.Reading glasses,old eyes,gorilla hands,magnification, tweezers,dental pick ,about an hour.It seems to work fine now.I've ran it for hours.Good separation of speeds,no heat.Amps low to high .30-.34-.40.Word of advice if working on one of these.The bakelite switch has no metal backing,it's thinner than a popsicle stick,old and brittle and if you try to tweak the switch it will break off.That's it laying there.Under close inspection it looked like a small spot of corrosion at the two wire breaks and no where else, like something dripped on it.The factory worker with no AC,a drop of sweat?Wild,assumption I know. Now for questions.There is no way to put solder on the tie in.Too small. Plus you can hardly solder nichrome .Could I use a small amount of conductive epoxy on the tie in to better secure?The ends of the coils look like they have insulating varnish.Can I use varnish on the nichrome to seal and to secure so they don't move against each other?The ones around the repair are a bit loose.I restored a Northwind and it had no varnish, just bare nichrome.Now the worn brass contacts at switch for speed change.If I solder the tips with lead tin to build it up would it hold up,or maybe silver solder? I have a switch coming but it's condition is described as worked and then it didn't,but I think I can combine the two. Here's a pic just for the heck of it because theres no way to see the tied wire.Any thoughts about this? Also have a brush cap coming.When I get it all together will post pics.By the way.That is not my wiring!-I do not use wire nuts! Solder and shrink tube only. Edited August 11, 2022 by Paul Carmody 1 Quote Link to comment Share on other sites More sharing options...
Paul Carmody Posted August 14, 2022 Author Share Posted August 14, 2022 (edited) This is the first R+M I have worked on.So what is this screw above the shaft behind the blade?Any other tricks I need to know when I do a restore on an R+M? Edited August 14, 2022 by Paul Carmody Quote Link to comment Share on other sites More sharing options...
Ron May Posted August 14, 2022 Share Posted August 14, 2022 48 minutes ago, Paul Carmody said: This is the first R+M I have worked on.So what is this screw above the shaft behind the blade?Any other tricks I need to know when I do a restore on an R+M? I believe that holds the bearing in place. 1 Quote Link to comment Share on other sites More sharing options...
Paul Carmody Posted August 14, 2022 Author Share Posted August 14, 2022 (edited) Thanks!-I can see that.I suppose it would help to align bearing when putting the rotor back in.Leave loose until it’s in then tighten?Is there any adjustability? Switch parts on the way.I ran this fan last night in the living room.Speed 1+2 are smooth and quiet.In high gear it’s like an airplane with slight vibration.Should be easy to address vibration. Edited August 14, 2022 by Paul Carmody Quote Link to comment Share on other sites More sharing options...
Ron May Posted August 14, 2022 Share Posted August 14, 2022 10 minutes ago, Paul Carmody said: Thanks!-I can see that.I suppose it would help to align bearing when putting the rotor back in.Leave loose until it’s in then tighten?Is there any adjustability? Not 100 percent sure on that model, but a lot of the smaller R&Ms have egg shaped bearings so you can leave that screw a little loose until everything is back together and aligned. 1 Quote Link to comment Share on other sites More sharing options...
Paul Carmody Posted October 10, 2022 Author Share Posted October 10, 2022 (edited) I posted on another thread about Nichrome and heat.Thanks to Stan I am moving on with the restoration.It may be on the back burner for a while until I get a Westinghouse and it’s parts fan off my desk.I will show my progress thus far. https://new.afcaforum.com/index.php?/topic/2886-how-hot-does-a-nichrome-speed-coil-get/#comment-19902 I’m going to tag these restores as I go because this new forum needs more information on it, and about specific fans.I’m am learning as I go and in no way an expert.This is my first R +M restore so any contribution to the thread is welcome.Any information on year make or even adds (Russ)would be helpful.Not for me but perspective on the 2610. It would have been terribly hard to start this hobby without the information gained from AFCA. Edited October 11, 2022 by Paul Carmody Quote Link to comment Share on other sites More sharing options...
Paul Carmody Posted October 10, 2022 Author Share Posted October 10, 2022 I have only oiled, lubed, cleaned.Addressd Switch.It is working but is loose, should be easy to address if the fragile Bakelite switch lever doesn’t break.I may have an idea on that.During running the oscillator would get stiff,the motor would bump up and clunk.I discovered the oscillator arm was dragging on the wheel.Figure one.These arms are incredibly stiff.With 2 vice grips I was able to hold and bend in different locations to keep the attachment flush with the wheel.Figure 2 it was bumping the case.Figure three there is a step right at the motor and base where the rod goes in causing the lift up and another bumping sound. Something to check if you run across this.Had the same thing on a 16 “ R+M that I have not restored. Quote Link to comment Share on other sites More sharing options...
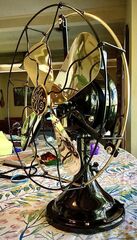
Paul Carmody Posted October 11, 2022 Author Share Posted October 11, 2022 (edited) The other fan . Edited October 12, 2022 by Paul Carmody Quote Link to comment Share on other sites More sharing options...
Paul Carmody Posted October 11, 2022 Author Share Posted October 11, 2022 (edited) Here Is the patient or victim depending on final outcome.Notice the only damaged wing.This is the story of my life.I have another nice one from the other fan.I may be able to work that out some?? if I do the other fan. Edited October 11, 2022 by Paul Carmody Forgot pic. Quote Link to comment Share on other sites More sharing options...
Paul Carmody Posted October 11, 2022 Author Share Posted October 11, 2022 The other day I was putting in oil and I just thought the oscillator cover opened from the top like a GE.The oil cup is shorter than the front and in a very tight spot and took great effort to get it stated back in.I thought this is the worst design where the cup was.I went to check the grease and when the screws were undone the lower gears a housing just slid open on its own.If you haven’t seen the R+M before.Oil and grease look to have been serviced.This looks to be a very sturdy design!The gears look to be held with a big pin.I would like to know how to take apart? I don’t think I’m going to mess with it.All looks clean and tight.But if you know the process please post. Quote Link to comment Share on other sites More sharing options...
Russ Huber Posted October 11, 2022 Share Posted October 11, 2022 (edited) Your R&M List 2610 9" five wing was made 1916-1920 with a brushed universal motor only. Edited October 11, 2022 by Russ Huber 1 Quote Link to comment Share on other sites More sharing options...
Paul Carmody Posted October 11, 2022 Author Share Posted October 11, 2022 Thanks for the reply Russ!Good thing I didn’t mess with it.It also answered my next question about what the collar was.The packing.Looks like the oscillator wheel is pressed on so I don’t think a packing change will happen.It’s not leaking anyway.The gears and shaft have absolutely no play.Very sturdy and precise.Not loose and sloppy like the GEs. Quote Link to comment Share on other sites More sharing options...
Paul Carmody Posted October 11, 2022 Author Share Posted October 11, 2022 The neck pivot and hardware look exactly like a Westinghouse.Where the motor rod goes into the base seems like a lot of slack. .(( I don’t suppose there is a way to shim or adjust that?)). The Westinghouse’s are the same way.It’s solid at the motor though,not wobbly like all Westinghouse’s .I haven’t took it apart to see.I’m pretty sure It’s the same as a WH. Quote Link to comment Share on other sites More sharing options...
Paul Carmody Posted October 11, 2022 Author Share Posted October 11, 2022 (edited) The threads are (( left handed)) like a lot of these fans and someone probably tried to loosen it the wrong way and snapped the thread off into the hole.Like a lot of fans!And this one and two or three others, boneheads cross threaded fully threaded right hand screws into the wheel.Luckily I was able to correct the threads.At least there are two or three more holes without a broken screw in it.I will deal with it later.You can’t use the reverse drill bit or easy out because the are for right hand threads.I may be able go from the top if there is room. I can’t seem to find a shoulder screws for an R+M . I ordered two a while back from McMaster and Carr that will work until if or when I find correct ones.I used one also for my 16”They are the same.Here is the paper for the ones I used if someone needs one.It’s stainless with a small allen head.The top line. So the question.Does the original use a washer?I think it needs a thin one.I will get at Ace.A pic of the original would be greatly appreciated. Edited October 12, 2022 by Paul Carmody Spell check Quote Link to comment Share on other sites More sharing options...
Paul Carmody Posted October 11, 2022 Author Share Posted October 11, 2022 Well it’s time to tackle this mess combining the two.I had finished and I guess when the gunk was cleaned out there was slack in the bearing because it is shot and sounded like a gas motor running.I hooked the switch to the one with no switch and it’s a good runner. I will return to the R+M in a bit. Quote Link to comment Share on other sites More sharing options...
Paul Carmody Posted October 12, 2022 Author Share Posted October 12, 2022 I found a pic of the shoulder screw and spacer.That would probably help In aligning the arm.But I think I may be SOL.It will be close for now with a washer or spacer.Back to the dreaded Westinghouse.Just posting new findings. Quote Link to comment Share on other sites More sharing options...
Recommended Posts
Join the conversation
You can post now and register later. If you have an account, sign in now to post with your account.