Paul Carmody Posted August 23, 2022 Share Posted August 23, 2022 Couple of teasers.Getting close to the finish.Switch done.Polished brass ,thermal blued hardware.More pics details coming soon. Quote Link to comment Share on other sites More sharing options...
Paul Carmody Posted August 28, 2022 Author Share Posted August 28, 2022 (edited) Tag detailed and cleared.The cage badge I darkened the black out and left to darken with age.The script and outer ring was carefully brushed with clear coat.You savvy fan guys know what fan it is now? Edited August 28, 2022 by Paul Carmody 1 Quote Link to comment Share on other sites More sharing options...
Paul Carmody Posted August 28, 2022 Author Share Posted August 28, 2022 (edited) I use Penetrol to clear all brass and hardware except blade.Either a fine brush or dip.It self levels and the metal absorbs it.It works great to coat patina too.On large items a lint free rag works well and it can be recoated at any time.The Bakelite switch also received some.It soaked it up like a sponge.And it rejuvenates faded plastic like on my car.It is designed to flow paint and add in adhesion which works well for touch up because it self levels. More to come if I would quit piddling. Edited August 28, 2022 by Paul Carmody 2 1 Quote Link to comment Share on other sites More sharing options...
Mel Lagarde Posted August 28, 2022 Share Posted August 28, 2022 Paul Thank you for showing us your beautiful work on this restoration. Outstanding. I had not heard of Flood Penetrol. Great suggestion. You do beautiful restorations. Your attention to detail is evident. 1 Quote Link to comment Share on other sites More sharing options...
Mark Olson Posted August 28, 2022 Share Posted August 28, 2022 Flood Penetrol is a great product (it also works well on low pressure refrigeration gaskets). 1 Quote Link to comment Share on other sites More sharing options...
Paul Carmody Posted August 29, 2022 Author Share Posted August 29, 2022 (edited) So this is the base plate inside insulating material.The original one is of suspect material!!?.It had to go!In its place is two pieces of fish paper glued together then glued to base.On the way is some hard to find very small brass plated split brads to replace the ones that broke that once held the old material in place.Only place I could find ones that small is a clock repair supplier.Screw and nuts protrude too far.The plate is flush. Edited August 29, 2022 by Paul Carmody Quote Link to comment Share on other sites More sharing options...
Paul Carmody Posted August 30, 2022 Author Share Posted August 30, 2022 (edited) I have one to pass on.I know everyone has experienced the hum or echo or wooom,coming from the base a lot of fans have while sitting on a cabinet,dresser etc.I put different things under them to try and quit them.I was test running this fan and put a silicone pot holder under it and it got quiet.Don’t worry my wife has no interest in fans and won’t be reading.So look at the perfect 7”Fit on the round black ones I got off Amazon. Im getting ready to polish the blade soon. Edited August 30, 2022 by Paul Carmody 1 1 Quote Link to comment Share on other sites More sharing options...
John Landstrom Posted August 31, 2022 Share Posted August 31, 2022 Paul, Would you please post the contact info for the small clock repair shop? looking for split/bifurcated rivets myself…looking for some that may work for reattaching the ID plate on the base of my 1030 GE fan base. thanks Quote Link to comment Share on other sites More sharing options...
Paul Carmody Posted September 1, 2022 Author Share Posted September 1, 2022 (edited) https://timesavers.com/search.html?q=Split+brads&go=Search I sent you a PM John. Edited September 1, 2022 by Paul Carmody Quote Link to comment Share on other sites More sharing options...
Paul Carmody Posted September 2, 2022 Author Share Posted September 2, 2022 (edited) I now have the brads and they worked well.They are very small and would not work for the ID plate.They are about half the head size and not robust enough.The originals were painted black.If anyone needs a set of brads for this style base plate,pre 1920.This is a 1920 but appears to have left over parts during transition.The base and one brass ring.The attachment screws have been oil blued. I will send a few sets of(3)no charge if someone needs a set.let me know. Edited September 2, 2022 by Paul Carmody Quote Link to comment Share on other sites More sharing options...
Paul Carmody Posted September 2, 2022 Author Share Posted September 2, 2022 (edited) Got the blade straight and balanced.I use long drill bits for balance rods.They are true and fit perfect, reasonably priced.This is 3/8th.I have one for each fan size. Hand polished and cleaned still needs final polish.I bought another fan just for the blade.I spent hours trying to straighten bends on the original.It was okay in the end but just okay.And it is loud. Edited September 2, 2022 by Paul Carmody 1 Quote Link to comment Share on other sites More sharing options...
Paul Carmody Posted September 2, 2022 Author Share Posted September 2, 2022 (edited) Here’s the base plate difference I mentioned.It has a full plate.Same type,later year.This sad donor has a beautiful patina with surface rust just right.It has not been tested but my thoughts are maybe in the future it would be neat to restore and polish brass yet leave patina.Cleaned and clear coated.If all checks out that is. Edited September 2, 2022 by Paul Carmody Quote Link to comment Share on other sites More sharing options...
Paul Carmody Posted September 21, 2022 Author Share Posted September 21, 2022 Back on it.I had to play mechanic for a bit. So this is neck hardware thermal oil blued and cleared.It is more blue in real.Wick installed.I know this is old news to the pros but the best way to get the wick in is to cut a point on end to pull through then cut both ends to size.I also oil lightly first to tighten cord and to slide better. Use a razor to cut the old wick in sections to remove.I picked that up on old forum back a few. Should add the Penetrol takes 2 or 3 days to dry completely.It soaks up and dries faster on iron than brass.It just needs a thin coat on brass.It does stay where you put it though and has a deep smooth shine.Blade is now polished ready for clear. Quote Link to comment Share on other sites More sharing options...
Paul Carmody Posted September 21, 2022 Author Share Posted September 21, 2022 Here’s a closer look.I have to show the details here because when it’s done no one will probably notice.Especially the inside.Hopefully in another hundred years. Quote Link to comment Share on other sites More sharing options...
Paul Carmody Posted September 22, 2022 Author Share Posted September 22, 2022 Bottom buttoned up.The inside of base left natural , coated in Penetrol for protection since last pic of base.The cast iron really soaks it up. Quote Link to comment Share on other sites More sharing options...
Paul Carmody Posted September 24, 2022 Author Share Posted September 24, 2022 I have now ordered quality buffs, jewelers rouge,finer sand paper for my next brass blade.I used some cheap wore out Harber Freight drill buffs,brown tropoli,with hours of hand buffing.I also ran out of extra fine sand paper with the lowest 1500 which created a lot of work.I now have all the way to 10,000 grit for next time for I have had enough.Hats off to Mr Gains,Mr Kaczar and the likes for their beautiful brass,because what ever they sell those fans for it is well worth it in labor alone.I have purchased a bench grinder, buffer with high end buffs and mandrel which I have not used because I am the king of last minute screw ups and I’m too close now.I have bent blades to practice on. Ready for clear coat. Quote Link to comment Share on other sites More sharing options...
Paul Carmody Posted September 24, 2022 Author Share Posted September 24, 2022 (edited) I didn’t get pics to begin with because I was in a hurry at first ,but the blade was black with grime,had chemical corrosion spots,some light dents.Someone did a spot on one blade with rough sand paper I assume to see if it was brass.(Don’t you hate when that happens) .There was some Super Clean that has been hanging in the garage for years .I just use what’s handy and man this stuff works.About 3 minutes,a going over with wetted piece of paper towel it was clean.I ordered that Flitz stuff to spray after thinking it would really clean the brass and it did little to nothing.Second pic is after 0000 steel wool. My other brass blade fans so far I have just done a hand buff, but this one was beyond that and no choice but to even it out. Edited September 25, 2022 by Paul Carmody Quote Link to comment Share on other sites More sharing options...
Paul Carmody Posted October 7, 2022 Author Share Posted October 7, 2022 (edited) Well I hit snag with clear coat.Do not use Eastwood Diamond clear for bare metal on a brass blade! It is not clear, will not not smooth out, will not buff out, and will eat into the fine pores in the brass.I suppose it’s some kind of acid etch.All the way back to stage one, and a lot of sanding. I like to use wet and dry sanded dry because it’s easier to see your progress.Use the finest grit that smooths it out.If there is deep scratches I would go no less than 1000 which is really too coarse .It’s hard to remove sanding scratches.I like to start with 3000,5000,7000,end with 10000 grit.You can see what you have and make small adjustments. Buffed with a drill motor this time.A good set of 3 stages of buffs.I started with Tripoli, second buff jewelers rouge, third buff Mothers.I would like to find something finer than the Tripoli.I’m am always open to suggestion. On the final hand buff from best to worst the polishes I tried.Mothers,Simichrome,Maas,Flitz,.(correction)Someone a while back recommended Wenol that I will try next time. The mess up allowed me to do it right so it worked out for the better. Edited October 10, 2022 by Paul Carmody Quote Link to comment Share on other sites More sharing options...
Ryan Hollenbeck Posted October 7, 2022 Share Posted October 7, 2022 40 minutes ago, Paul Carmody said: Well I hit snag with clear coat.Do not use Eastwood Diamond clear for bare metal on a brass blade! It is not clear, will not not smooth out, will not buff out, and will eat into the fine pores in the brass.I suppose it’s some kind of acid etch.All the way back to stage one, and a lot of sanding. I like to use wet and dry sanded dry because it’s easier to see your progress.Use the finest grit that smooths it out.If there is deep scratches I would go no less than 1000 which is really too coarse .It’s hard to remove sanding scratches.I like to start with 3000,5000,7000,10000 grit.You can see what you have and make small adjustments. Buffed with a drill motor this time.A good set of 3 stages of buffs.I started with Tripoli, second buff jewelers rouge, third buff Mothers.I would like to find something finer than the Tripoli.I’m am always open to suggestion. On the final hand buff from best to worst the polishes I tried.Mothers,Simichrome,Maas,Flitz,.And the once great until the feds in the 2010s took out the good or bad stuff depending how one views it….Brasso! Complete crapp.Someone a while back recommended Wenol that I will try next time. I used the process described here: http://whiteglovefans.com/blog/2013/9/30/how-to-professionally-polish-brass Works great! Cheers 1 Quote Link to comment Share on other sites More sharing options...
Paul Carmody Posted October 7, 2022 Author Share Posted October 7, 2022 Thanks! Blue rouge and a flannel wheel. I am a experimenter, and try to use whats laying around.Others may learn from my mistakes. I have finished and want to show a little more on process first. I in no way claim to be an expert in any part of fan restoration.I just stumble along and show how I go about it.I should have showed the start of the restoration but was in a hurry because it’s a gift to my daughter for her new place.The parts fan purchased after starting was in better shape. Quote Link to comment Share on other sites More sharing options...
Paul Carmody Posted October 7, 2022 Author Share Posted October 7, 2022 (edited) I found some good products for the final finish.First,the best thing for applying polish is a piece of felt.It really holds the polish so it goes a long way and works like a magic eraser.May be hard to believe but micro fiber will scratch the finish.These jewelry towels from Walmart are two sided treated and really do the job on buffing.I prefer the gold polish cloth but they were out.The silver works well too.This Cape cod stuff comes with two small saturated cloths.I just dabbed some and used felt to wipe it in.It goes a long way.After all the buffing and cleaning it still produced black green on the surface.I don’t know what all is in this but it actually further reduced fine lines and buffed to a high shine above the mothers.it’s also a treatment to keep it from tarnishing.Will see?I still may clear coat later on.And it smells like coconuts. Edited October 13, 2022 by Paul Carmody Quote Link to comment Share on other sites More sharing options...
Paul Carmody Posted October 7, 2022 Author Share Posted October 7, 2022 For the final paint finish I end with Menzerna for the final buff.I wet sand first and only use it for hand buff on a fan.Fantastic stuff on cars too.This Blackfire shines and protects like crazy.I won’t show all the waxes I have to compare. Quote Link to comment Share on other sites More sharing options...
Paul Carmody Posted October 7, 2022 Author Share Posted October 7, 2022 You say Menzerna compared to what?Not including what’s been thrown away this is what’s sitting around.All good products and some useful for car painting.But in the end. Quote Link to comment Share on other sites More sharing options...
Paul Carmody Posted October 7, 2022 Author Share Posted October 7, 2022 One more thing to note.I thought the cage braces were bent back.I run the fan without a cage and it was fairly quiet.I put the braces on and it was really loud.I had pulled the braces forward and it caused a disturbance I suppose in the wind.The further back I pushed,bent them,the quieter it became.That includes the top brace. 1 Quote Link to comment Share on other sites More sharing options...
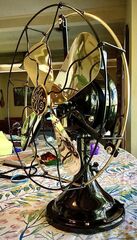
Paul Carmody Posted October 7, 2022 Author Share Posted October 7, 2022 Okay.I won’t bore you any longer.Especially the pros but here it is. 3 Quote Link to comment Share on other sites More sharing options...
Recommended Posts
Join the conversation
You can post now and register later. If you have an account, sign in now to post with your account.