Paul Carmody Posted December 6, 2023 Share Posted December 6, 2023 (edited) I had started this conversation on George’s thread about broken pot metal.So not to take over his thread I will show progress or failure here.I’m only concerned with oscillator and probably not going into full resto at this time.I considered what Russ suggested about the place for casting a replacement.I think with shipping and casting it would exceed the worth of the fan.Here’s where it left off. https://new.afcaforum.com/index.php?/topic/7070-interest-in-menominee-fans/ I had a question that I found a picture of on the old forum.I knew nothing of Menominee fans and there is a wealth of information there .95% by Russ.I still am not sure of the washer thickness or how much slack between the nut and gear.If anyone knows I sure would appreciate that knowledge.If not I will wing it.First plc from old forum,second the gap. https://www.afcaforum.com/forum1/27818.html Edited December 29, 2023 by Paul Carmody 1 Quote Link to comment Share on other sites More sharing options...
Paul Carmody Posted December 6, 2023 Author Share Posted December 6, 2023 (edited) So here is where I’m at.The pot metal parts soaked and cleaned in gasoline, washed off,Acetone and degreaser.Then I boiled in laundry baking soda and Borax.I could smell grease ,the water was near black after the previous soaking and cleaning.Washed parts and pan,boiled again in water and dishwashing soap with less clouding.Clean again then boil in first mixture again coming up clean this time.Following Russes advice about soaking in thinner ,I let them soak in a jar of lacquer thinner for a day. Now I have started the test phase to see what if anything will stick before going forward. In the pic I put dabs of epoxy and resin.In order left to right.First is our regular JB weld go to.I thought I was out but I found these that I’ve had since I had a full head of hair.Second is fiberglass resin.If you have worked with this stuff it sticks to almost any bare surface,steel,tin,wood,some plastic,and concrete ,it’s permanent.If you try to chip it off of concrete,the concrete comes with it.But what about pot metal?3 is JB weld steelstik which I abraded the surface more because it is more solid like clay and is very good for build ups or larger areas and is hard as a rock.Last and new to me is 3m structural adhesive DP420.I watched some independent as well as 3m test and they were pretty amazing.First it is expensive,it does not come with mixing nozzles that have to be changed each time ,and you need to buy an applicator that I found out after receiving as there is no plunger.If you go all 3m it will set you back close to a hundred.I got this off eBay.The shelf date just went so I got it half off Amazons price.Other eBay sellers can be found at least $10.cheaper.Amazon knock off 20 pack nozzles and applicator together $35.I’m still in for $55.I hope it has a shelf life! Hard pull with thumbnail.All pass.Next small screw driver hard push.The regular JB weld it received top damage but is bonded to pot metal.The rest received no damage and are bonded.Next large screw driver and more pressure.Again same results as last.Now a hammer on screw driver.I’m doing this as I post. In the pic the final results with some pretty hard chiseling they all held pretty well to begin with.The regular JB weld bonded but is softer and came up in pieces some left.The resin came up only because as can be seen a light bit of pot metal came with it.JB steel stick took a beating but popped off clean.The BP 420 held tight.I went back and had to tap into metal to pop it off.It looks like 3m then fiberglass resin.Both should do the trick.I will make deeper abrasions like 80 or 60 grit going forward to help adhesion .What looks like crude horse cut outs is actually part of the plan.I’ll be back! Edited December 8, 2023 by Paul Carmody 3 Quote Link to comment Share on other sites More sharing options...
Patrick Ray Posted December 6, 2023 Share Posted December 6, 2023 Great write up! Thank you for posting your methodology as well! 1 Quote Link to comment Share on other sites More sharing options...
Paul Carmody Posted December 10, 2023 Author Share Posted December 10, 2023 (edited) A lot been going on ,so finely got a bit done.So now got the horse cutout in place.The pics looks like big screws and nuts ,but their just 4-40s.It’s just mock up now and all the excess threads will be cut off after final set and it all gets epoxied in.It’s not going anywhere as it is.The flush side screw heads against motor are counter sunk ,and I still have to drill factory screw holes that will add more support.I may buy some tapered screws for outside bottom to counter sink and fill in to make them disappear ,or just leave it for the fans history.What do you think?I could also use washers on the inside under nuts and after epoxy sets ,remove nuts ,snip above washer and epoxy it in to make it less noticeable.But I probably won’t as there is no clearance issues.I will get all of it sanded and cleaned up for epoxy ,and another small crack on the other side to attend. Edited December 19, 2023 by Paul Carmody 3 Quote Link to comment Share on other sites More sharing options...
Paul Carmody Posted December 10, 2023 Author Share Posted December 10, 2023 (edited) Something a little interesting.That dark pattern appears to be molded separate from the cast.Like added support possibly,?It is flush on the bottom ,but is sanded visibly in the curve up the side.I noticed in the pic those numbers.They are tiny and can’t be seen with with reading glasses ,and not legible with magnification.The light hit it just right when the picture was taken. Edited December 11, 2023 by Paul Carmody 2 Quote Link to comment Share on other sites More sharing options...
Paul Carmody Posted December 13, 2023 Author Share Posted December 13, 2023 (edited) So here is where I’m at.I went along the crack and drilled some small holes it so there would be no runners in the future ,plus adding some more bond.Then I got a small file and beveled the edge slightly both sides of crack so I can sand smooth and leave more bond area ,and sharp edges are more likely to crack.The pot metal was already tarnishing so I lightly wire wheel the contact area with a small wheel leaving the bond area rough.The DP 420 nozzle is great for putting a small precise line on both surfaces.It actually locked together well ,and was held together with rubber bands.It gives plenty of work time before it starts to set. Well I will tell you ,not being familiar with the product I didn’t know what to expect.Sitting over night this stuff is hard as stone ,and it is bonded.I’m quite sure the pot metal would break again before the repair.I think now the extra plate probably is not needed.I may still move ahead with it just to support the existing pot metal.I also intend to coat the entire inside case with a light coat of 420 or fiberglass resin to permanently support the pot metal.I have abraded the entire surface with 80 grit except the gear run surface.It will not break again.Ever! Edited December 19, 2023 by Paul Carmody 3 Quote Link to comment Share on other sites More sharing options...
Paul Carmody Posted December 13, 2023 Author Share Posted December 13, 2023 (edited) Next the other crack.I have drilled holes along it for the reason I described,most importantly where the crack ends to ensure it will not start again.I next will get a Dremel and small cut off wheel ,and carefully cut into the crack both sides ,not going all the way through ,and some bevel before epoxy. Edited December 13, 2023 by Paul Carmody 3 Quote Link to comment Share on other sites More sharing options...
Paul Carmody Posted December 19, 2023 Author Share Posted December 19, 2023 (edited) These Christmas 🎄 Preparations are getting in the way of my fans! Little at a time. I want to say that I don’t now ,or at any time hold the seller responsible.This is the third fan I have purchased from him ,and all have been packed with great care.I am now glad it happened ,because it had the most flawed casting I have ever seen.It was the perfect definition of not if ,but when it would break. Once I sanded it you would think it was molded in pieces and stuck together.One spot looked like a crack but not all the way through.The bottom of case and sidewalls looked like there was a seam. I get what Russ said about the shortage of war time metal and pot metal ,except that the motor ,ring ,neck is heavy,really heavy cast iron ,and the base is stamped steel.Built to withstand a bombing ,and one small yet important part made with the worst metal. Magnets. Edited December 19, 2023 by Paul Carmody 1 Quote Link to comment Share on other sites More sharing options...
Paul Carmody Posted December 19, 2023 Author Share Posted December 19, 2023 (edited) If you have ever followed any of my restorations ,if anything I am not consistent.Constantly looking for the better product with experimentation.You name the glue,epoxy,etc and I have probably tried it.When it comes to get what you pay for is true with this 3M.It is hard and bonds like nothing I have ever used.It is a bit thin and hardens relatively slow ,but when it does you better make sure you want it there.I believe with this ,like paint, proper prep is important. There was no reason to leave the screws,only for support until the adhesive set on my support plate.I put thick nylon washers on each side between screw head and nut.I tried to keep adhesive away from screws ,but in case they set in,I could easily snip them off flush through the nylon.The counter sunk ones in the mounting surface I left and sealed them in. Edited December 19, 2023 by Paul Carmody 2 Quote Link to comment Share on other sites More sharing options...
Paul Carmody Posted December 19, 2023 Author Share Posted December 19, 2023 (edited) After it set ,I ran a bead around the bottom inside edge ,then brushed the entire inside surface with the DP 420. Its thinner than it looks.Making sure not to get any on gear run surfaces.My wife had me repair two porcelain chickens while I was at it. It should withstand a Texas tornado.I hope I don’t get the opportunity to prove that.Some years ago one went over my house and twisted the tops out of my 50,60 ft Elm 🌳 trees and took them away.At least I didn’t have to clean them up and I’m here to talk about it. Now sand,prime,paint. Edited December 19, 2023 by Paul Carmody 2 Quote Link to comment Share on other sites More sharing options...
Paul Carmody Posted December 19, 2023 Author Share Posted December 19, 2023 (edited) Making headway now.I went over the whole case with 180 grit to blend in repairs and smooth all bumps and flaws in casting.Next went over the whole unit with 400 grit to smooth out all sanding scratches.I have only painted the inside at this point because there was not a lot of prep.It was not necessary to paint because once grease is in there ,only I would know.But I do.Lightly sanded ,used an adhesion promoter ,then a self etching satin. Yeah the chicken.Well I messed around and knocked it off the desk and shattered the tail beyond repair.The good thing ,the repairs made held.Since it was destroyed I put full force trying to break at the repairs and there was no way.I know what I’m going to use on the next broke porcelain switch base. Moving on next to outside. Edited December 19, 2023 by Paul Carmody 7 Quote Link to comment Share on other sites More sharing options...
Bob Peshoff Posted December 20, 2023 Share Posted December 20, 2023 That is some very special work. Amazing!!! 2 Quote Link to comment Share on other sites More sharing options...
Paul Carmody Posted December 29, 2023 Author Share Posted December 29, 2023 (edited) I was hoping to show more progress but the weather is not cooperating.It was full on humidity and rain,then straight to cold.I have it ready for the next warm day.Adhesion promoter,acid etch primer.That’s the black showing under the filler primer.A bit of red filler putty on a couple of small spots,sanded with 500 grit.All the rough casting smooth as silk.I have to be patient.Not one of my better traits. Edited December 29, 2023 by Paul Carmody 1 Quote Link to comment Share on other sites More sharing options...
Paul Carmody Posted December 29, 2023 Author Share Posted December 29, 2023 (edited) While waiting on weather for two paint projects. I have this dirty bent cage wobble neck that I was going to gift ,but didn’t want to mess with the blade at the time.They got a GE instead.I decided to see about the blade.it was going good until a spark show.This is why you should always check wiring before plugging in.One acorn that someone thought was a good idea came off and shorted to the case and other wire then started welding. Edited December 29, 2023 by Paul Carmody Quote Link to comment Share on other sites More sharing options...
Paul Carmody Posted December 29, 2023 Author Share Posted December 29, 2023 (edited) I compounded the paint.It shined up nice.Then hand polished one blade just to see.I got the wings back in line and Its close.I still have to balance.There is no scratches or bends in the blade.It’s amazing because the cage is bent up a lot,and two wires,rods?Anyway they need to be welded.Very clean little Emerson.I cut out all the bad wire and it’s just temporary for testing.It runs well but has a rattle Inside.The bearings are tight.I haven’t broke it open yet other than the rear bullet.I have no attachment to the Emerson so it will go when completed. This is just filler.Next time I’ll have the Menominee gear box painted and up and running 🏃♂️.Anyway I hope running. Edited December 29, 2023 by Paul Carmody 2 Quote Link to comment Share on other sites More sharing options...
Paul Carmody Posted January 8 Author Share Posted January 8 (edited) I know it’s been awhile.I was hoping for warm weather and that’s not happening ,so I put some of my wife’s stocking pants things on the end of the dryer hose and heated the garage to some degree.I used oil base black with an activator and enamel reducer.I probably could have used acetone instead and it would have dried faster.It took a couple of days.It did flow wet and looks like a coating of porcelain.Now the rest of the fan looks sadder.Someone’s poor ,quick spraybomb over dirt and rust. Edited January 8 by Paul Carmody 1 Quote Link to comment Share on other sites More sharing options...
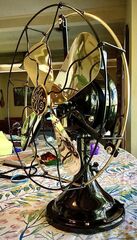
Paul Carmody Posted January 8 Author Share Posted January 8 All together.It was the first time I run the fan and it was clunking,grinding,jerking ,the brushes sparking with ozone filling the air.I was up all night trying to fine tune.The blade was way out of wack.I had to shim the small gear to get it to mesh properly,trial and error of different shims as well as aligning the gear.Adjust the oscillator arm.It still needs some fine tuning.The blade still needs work.Once I shot oil in the bearings it started smoothing out and the longer it runs the better.The brushes got quieter with less spark,no ozone smell now.There’s a rattle in the base.I do have my work cut out if I decide to proceed. 1 Quote Link to comment Share on other sites More sharing options...
Paul Carmody Posted January 8 Author Share Posted January 8 Short video so it will load.I may come back later and show it all together. IMG_1879.mov 1 Quote Link to comment Share on other sites More sharing options...
Paul Carmody Posted January 8 Author Share Posted January 8 It’s really smoothing out the longer it runs.The chatter is not as noticeable in real .It’s the brushes. IMG_1890.mov 1 Quote Link to comment Share on other sites More sharing options...
James Landry Posted January 9 Share Posted January 9 2 hours ago, Paul Carmody said: I know it’s been awhile.I was hoping for warm weather and that’s not happening ,so I put some of my wife’s stocking pants things on the end of the dryer hose and heated the garage to some degree.I used oil base black with an activator and enamel reducer.I probably could have used acetone instead and it would have dried faster.It took a couple of days.It did flow wet and looks like a coating of porcelain.Now the rest of the fan looks sadder.Someone’s poor ,quick spraybomb over dirt and rust. EXTRAORDINARY WORK!!!!! :) 1 Quote Link to comment Share on other sites More sharing options...
Paul Carmody Posted January 9 Author Share Posted January 9 (edited) So I usually have a happy ending ,but as it turns out.Frankenfan!🙁The blade hub is way to big for this fan.It sits against the outside of the bearing housing instead of the oil slinger,groove on the inside as can be seen with the shiny ring on the hub.I could shim up the armature shaft on the backside and run it,or run it on the spacer as shown.The brushes were in great condition,it has separation in all speeds.Someone fabricated a switch handle but it’s functional. Edited January 10 by Paul Carmody 1 Quote Link to comment Share on other sites More sharing options...
Paul Carmody Posted January 9 Author Share Posted January 9 (edited) Edited January 10 by Paul Carmody 1 Quote Link to comment Share on other sites More sharing options...
Bobby Gaines Posted January 9 Share Posted January 9 Great Job Paul! A lot of work but it payed off. 1 Quote Link to comment Share on other sites More sharing options...
Michael Rathberger Posted January 9 Share Posted January 9 Well done. It sure looks like a menominee blade though, the rounded edges are distinctive. Is it a 12 or 8" blade? 1 Quote Link to comment Share on other sites More sharing options...
Geoff Dunaway Posted January 9 Share Posted January 9 I think that is the correct blade for that fan and looking from the front, blade could come forward another 1/8 of " maybe? Perhaps was never designed for the blade to receed into the nose of the front motor housing ?? 1 Quote Link to comment Share on other sites More sharing options...
Recommended Posts
Join the conversation
You can post now and register later. If you have an account, sign in now to post with your account.